RxJS in Angular: Creating a Weather App

13 min read

RxJS in Angular can seem a bit difficult at first. But once you learn to leverage its power, it makes your code cleaner and more readable!

In this article, I'm going to walk you through developing a simple weather app in Angular and in the process (hopefully!) give you an overview of the most commonly used RxJS features.

The final result is shown below.
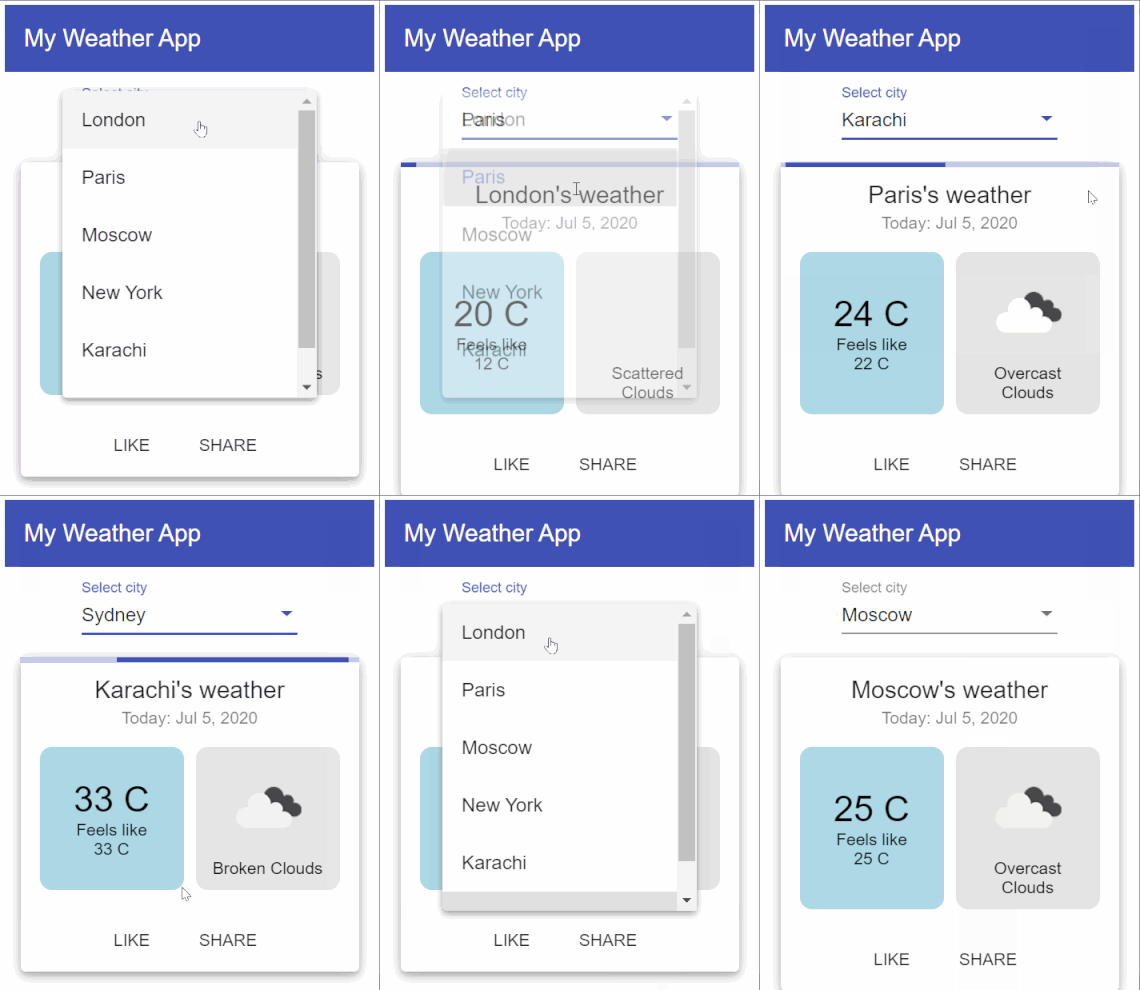
Final weather app

Our final weather app using RxJS

Haven't heard about RxJS? It is a Javascript library used to handle asynchronous events and flows emanating from them. Think network calls, notifications and user events. All of these can happen at different times in our apps and RxJS provides us with tools to handle these observable streams, compose them, mix and match to give us the results that we want!

Read more about them here.

Ok, let's kick off our project!

Preparing the project

For the weather app, we just need a simple Angular project, with the Angular Material components library included. This can be achieved by running these commands.

ng new weather-app
ng add @angular/material

The layout of the app is quite simple. We add a material select component in the app.component.html file. Then, we have its corresponding code representing names of cities in the app.component.ts file.

<mat-toolbar color="primary"> My Weather App </mat-toolbar>
<div class="content">
  <mat-form-field>
    <mat-label>Select city</mat-label>
    <mat-select [formControl]="cityControl">
      <mat-option *ngFor="let city of cities" [value]="city">
        {{city}}
      </mat-option>
    </mat-select>
  </mat-form-field>
  <br />
  <router-outlet></router-outlet>
</div>
@Component({
  selector: "app-root",
  templateUrl: "./app.component.html",
  styleUrls: ["./app.component.scss"],
})
export class AppComponent implements OnInit, OnDestroy {
  cities = ["London", "Paris", "Moscow", "New York", "Karachi", "Sydney"];

  cityControl: FormControl;

  constructor(private router: Router) {}

  ngOnInit() {
    this.cityControl = new FormControl("");
    this.cityControl.valueChanges.subscribe((value) => {
      this.router.navigate([value]);
    });
  }

  ngOnDestroy() {}
}

Simple enough? Our select control takes its option values from a simple string array we define here.

What should happen when a city is selected? Since the reactive forms in Angular provide us an observable out of the box to listen to changes in the select control, we just subscribe to the observable to navigate to a route.

Any observable needs to be subscribed to in order for it to execute. This subscription can happen in code as we're doing here. OR in a better way, on the template using the 'async' pipe. We'll come to that in a bit!

Talking about routes, we've added a router-outlet in the template file. And if we look at our app.module.ts, we define our routes like this.

const routes: Routes = [
  {
    path: "",
    component: WeatherReportComponent,
  },
  {
    path: ":locationName",
    component: WeatherReportComponent,
  },
];

I'll be coming to the Weather Report Component in a bit (since that contains our core functionality). But here all you need to see is the routing configuration that we've setup. The locationName parameter will be used in our weather report component to fetch the weather data.

Basic flow of the app

You might have already figured out by now. But just to be clear, the basic flow will be something like this:

  • User selects the city
  • The app will be routed to the correct route with the city name
  • Our weather report component will use the city name and fetch weather data, displaying it on the card

Open Weather API and the weather service

We'll be using the Open Weather Map API to fetch the data about the current forecast in our city of choice. It is a free API for the most part. More details about the different options for their API are available on their website.

To add better structure to our app, let's encapsulate the API call in a weather service component.

@Injectable({ providedIn: "root" })
export class WeatherService {
  constructor(private http: HttpClient) {}

  getWeatherForCity(city: string): Observable<any> {
    const path = `https://api.openweathermap.org/data/2.5/weather?q=${city}&units=metric&APPID=695ed9f29c4599b7544d0db5c211d499`;
    return this.http.get(path);
  }
}

This is quite self explanatory! Our function takes in a city name and just returns an observable from the HttpClient GET call.

Note: This is the second time we're seeing an Observable again. Wherever we have an observable, we've a good opportunity to utilize RxJS.

Our app now looks like this.
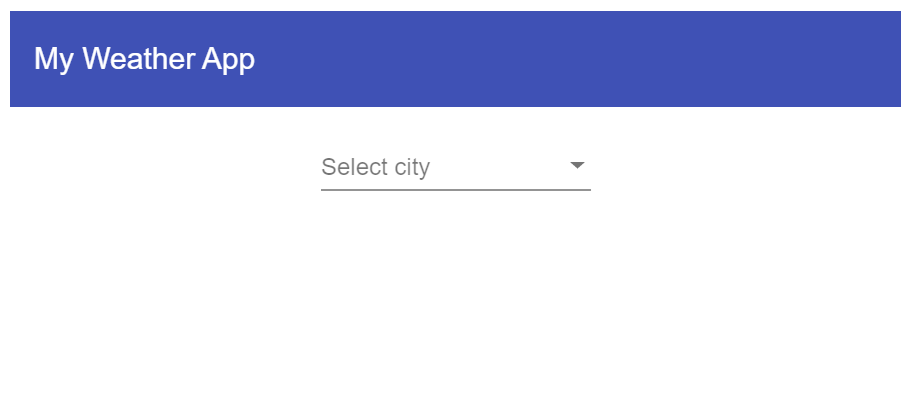
The city dropdown control

Looks like the basics are setup! Let's go ahead and add our main functionality which is the weather report component.

Building an RxJS Observable stream

We use operators in RxJS to manipulate or change our observable streams. There are a whole host of them available! But, don't worry. We don't need to know all of them. In practice, only a few will suffice for your needs (you can always catch up on the others as you go along).

Since we already know we're receiving the location name in the form of route parameters, let us start from there.

Note that our routeParams are also an observable!

@Component({
  selector: "app-weather-report",
  templateUrl: "./weather-report.component.html",
  styleUrls: ["./weather-report.component.scss"],
})
export class WeatherReportComponent implements OnInit {
  constructor(
    private weatherService: WeatherService,
    private route: ActivatedRoute
  ) {}

  ngOnInit() {
    // Our route params observable
    this.route.params;
  }
}

Most beginners would subscribe to this observable and try to use the param value. But there is a better way to go about this! Let's first see what we actually want to do.

  1. Get the locationName parameter from the route params
  2. Check if the parameter has some value
  3. Call our weather service function for this value
  4. Store the value somewhere so it can be used in our template

Here is how we can use RxJS for each of them.

  1. Use the map operator to transform the params object into our parameter
  2. Use the filter operator to check if we have a valid value
  3. Use a concatMap operator to append or concatenate our service function (which also is an observable, remember?)
  4. Directly assign this observable chain to a data$ observable which we can then use in our template with the async pipe. Hint: That way, we won't need to subscribe or unsubscribe to anything in our code.

The weather-report.component.ts now looks like this.

@Component({
  selector: "app-weather-report",
  templateUrl: "./weather-report.component.html",
  styleUrls: ["./weather-report.component.scss"],
})
export class WeatherReportComponent implements OnInit {
  data$: Observable<any>;

  constructor(
    private weatherService: WeatherService,
    private route: ActivatedRoute
  ) {}

  ngOnInit() {
    this.data$ = this.route.params.pipe(
      map((params) => params["locationName"]),
      filter((name) => !!name),
      concatMap((name) => this.weatherService.getWeatherForCity(name))
    );
  }
}

Notice how no callbacks or conditional statements are required! It is all very clean and readable, even for someone looking at the code for the first time.

Common RxJS Operators

Let's go through each operator and what it does quickly.

Map - The map operator is simply used to transform the output from the observable. The function is used to specify the transformation. You can make the transformation as complex or simple as you want.

Filter - The filter operator is used to control the flow of the observable according to the condition specified. So in our case e.g. the locationName parameter needs to be some valid value (for which we use the double !!) before sending it to the API call. If the value is null or empty, it would simply stop the observable execution.

ConcatMap - This operator is called a higher order mapping operator. It allows us to join another observable with the original one in the same sequence. There is a lot more detail about this and similar operators like switchMap, mergeMap etc. at various other resources. For our purposes, any of these will work.

Let's now look at how we've setup the template for our component.

<mat-card class="mat-elevation-z5" *ngIf="data$ | async as data">
  <mat-card-header>
    <mat-card-title>{{data.name}}'s weather</mat-card-title>
    <mat-card-subtitle>Today: {{today | date }}</mat-card-subtitle>
  </mat-card-header>
  <mat-card-content>
    <div class="flex-row">
      <div class="temp">
        <span class="big-text">{{data.main.temp | number:'0.0-0'}} C</span>
        <span>Feels like </span>
        <span>{{data.main.feels_like | number: '0.0-0'}} C</span>
      </div>
      <div class="outlook">
        <span>{{data.weather[0].description | titlecase}}</span>
      </div>
    </div>
  </mat-card-content>
  <mat-card-actions>
    <button mat-button>LIKE</button>
    <button mat-button>SHARE</button>
  </mat-card-actions>
</mat-card>
:host {
  display: flex;
  justify-content: center;
  position: relative;
}

.top-bar {
  position: absolute;
  left: 0;
  top: 0;
}

mat-card {
  width: 250px;
}

mat-card::ng-deep.mat-card-header-text {
  width: 100%;
}

.flex-row {
  display: flex;
  flex-direction: row;

  > div {
    flex: 50%;
    border-radius: 10px;
  }

  > .outlook {
    padding: 10px;
    color: black;
    background: rgba(0, 0, 0, 0.1);
  }

  > .temp {
    background: lightblue;
    padding: 10px;
    color: black;
    margin-right: 10px;
    display: flex;
    flex-direction: column;
    justify-content: center;
    align-items: center;
  }

  .big-text {
    font-size: 30px;
  }

  .caption {
    text-transform: uppercase;
    font-size: 15px;
  }

  .image {
    height: 80px;
  }
}

We're using a material card component to bind different items from the data we get from the API. Notice the use of the data$ variable with the async pipe. The *ngIf ensures that the card won't be shown if there is no data. The alias data is a useful way to ensure the async pipe is only used at one place in the template.

I'm including the CSS file here just for completeness. The styling is pretty standard stuff for those who've done layouts. If you want to know more about this part, see my companion post on how I did it. I'll skip over this for now.

Great! Now we have a working version of our app as shown below.
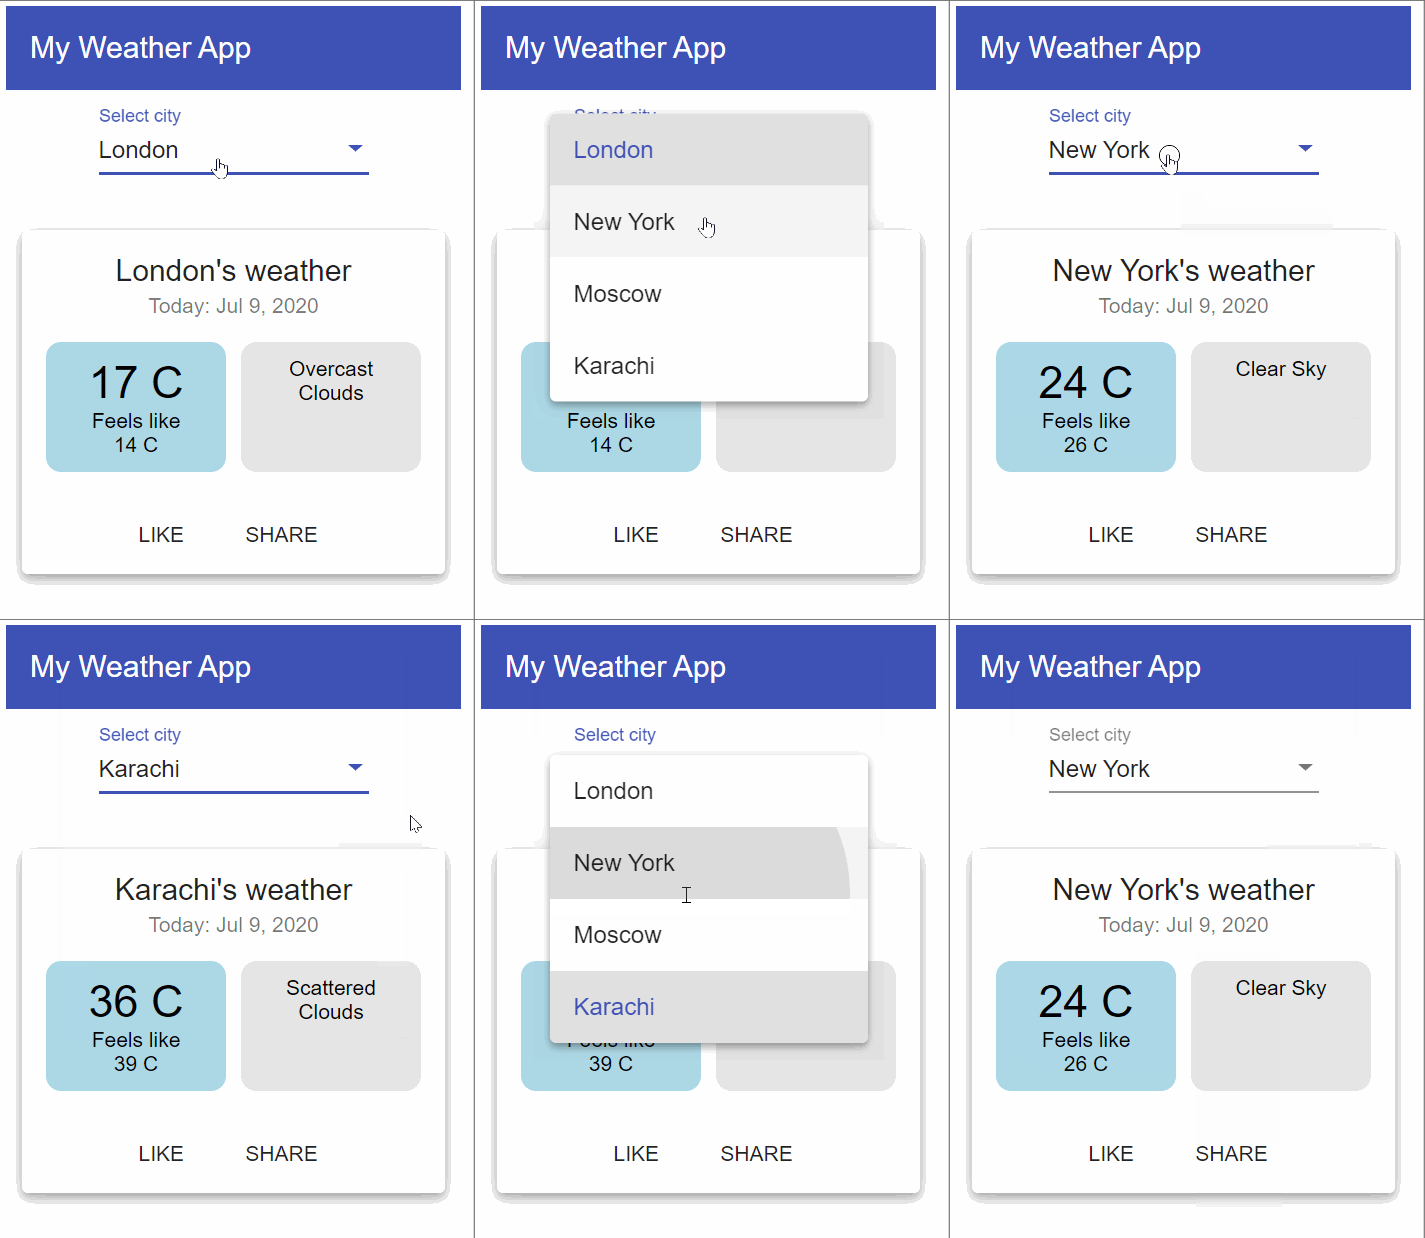
Basic working app in Angular RxJS

Adding the weather icon with RxJS Map

You might've noticed that the weather icon in the final result is missing. This is because we don't get the url for the icon image in the data. Instead we just get an icon identifier string which can then be used to construct a url.

There are multiple ways to do this. Let's use RxJS again to make things easier for us. Since we get an observable from the weather service, we can add a map transformation within the service, so that we get an image url ready for use in our template. The transformation uses the spread operator to keep everything else the same and just appends an image property with our image url.

getWeatherForCity(city: string): Observable<any> {
    const path = `https://api.openweathermap.org/data/2.5/weather?q=${city}&units=metric&APPID=695ed9f29c4599b7544d0db5c211d499`;
    return this.http.get(path).pipe(
      map(data => ({
        ...data,
        image: `http://openweathermap.org/img/wn/${data.weather[0].icon}@2x.png`
      })),
    );
  }

Then, we simply add an img tag in our template right below the outlook text.

<div class="outlook">
  <img [src]="data.image" class="image" />
  <span>{{data.weather[0].description | titlecase}}</span>
</div>

And we've a nice looking icon to show the current weather report in a visual form.
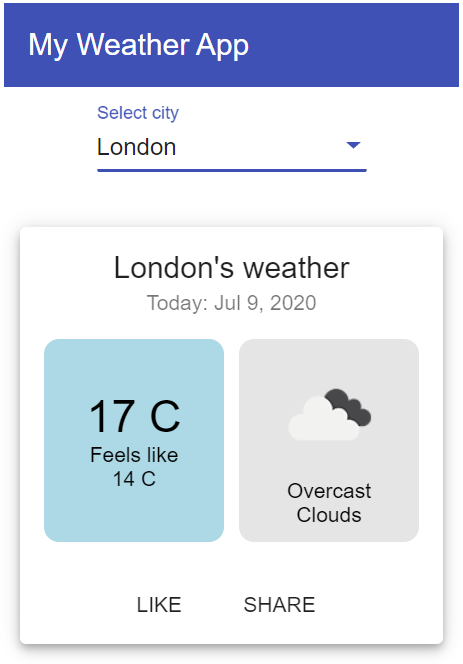
Weather icon added

Nice touch!

Adding the loading indicator with RxJS Tap

The Open Weather Map API is quite snappy. However, on very slow connections, we might still need to give a visual indicator to the user till we get the data. Let's add a material progress bar at the top of the card to serve this purpose.

How do we control when to show the loader and when to hide it? We'll keep a boolean in our component and use the tap operator in RxJS to set it at at different times in our observable pipeline.

this.data$ = this.route.params.pipe(
  map((params) => params["locationName"]),
  filter((name) => !!name),
  tap(() => {
    this.loading = true;
  }),
  concatMap((name) => this.weatherService.getWeatherForCity(name)),
  tap(() => {
    this.loading = false;
  })
);

The tap operator is perfect for cases where we need to specify a "side effect" in our observable pipeline. It doesn't change the output or the flow of the observable in any way. So it's well suited for setting status variables like this. The rest of the stream keeps working as it is.

Just to simulate our loading on slower networks, I've added a delay operator to the weather service. It will just add a 500ms delay to the observable.

getWeatherForCity(city: string): Observable<any> {
    const path = `https://api.openweathermap.org/data/2.5/weather?q=${city}&units=metric&APPID=695ed9f29c4599b7544d0db5c211d499`;
    return this.http.get(path).pipe(
      map(data => ({
        ...data,
        image: `http://openweathermap.org/img/wn/${data.weather[0].icon}@2x.png`
      })),
      delay(500)
    );
  }

Very convenient for testing. Here is how the loading indicator looks like now.
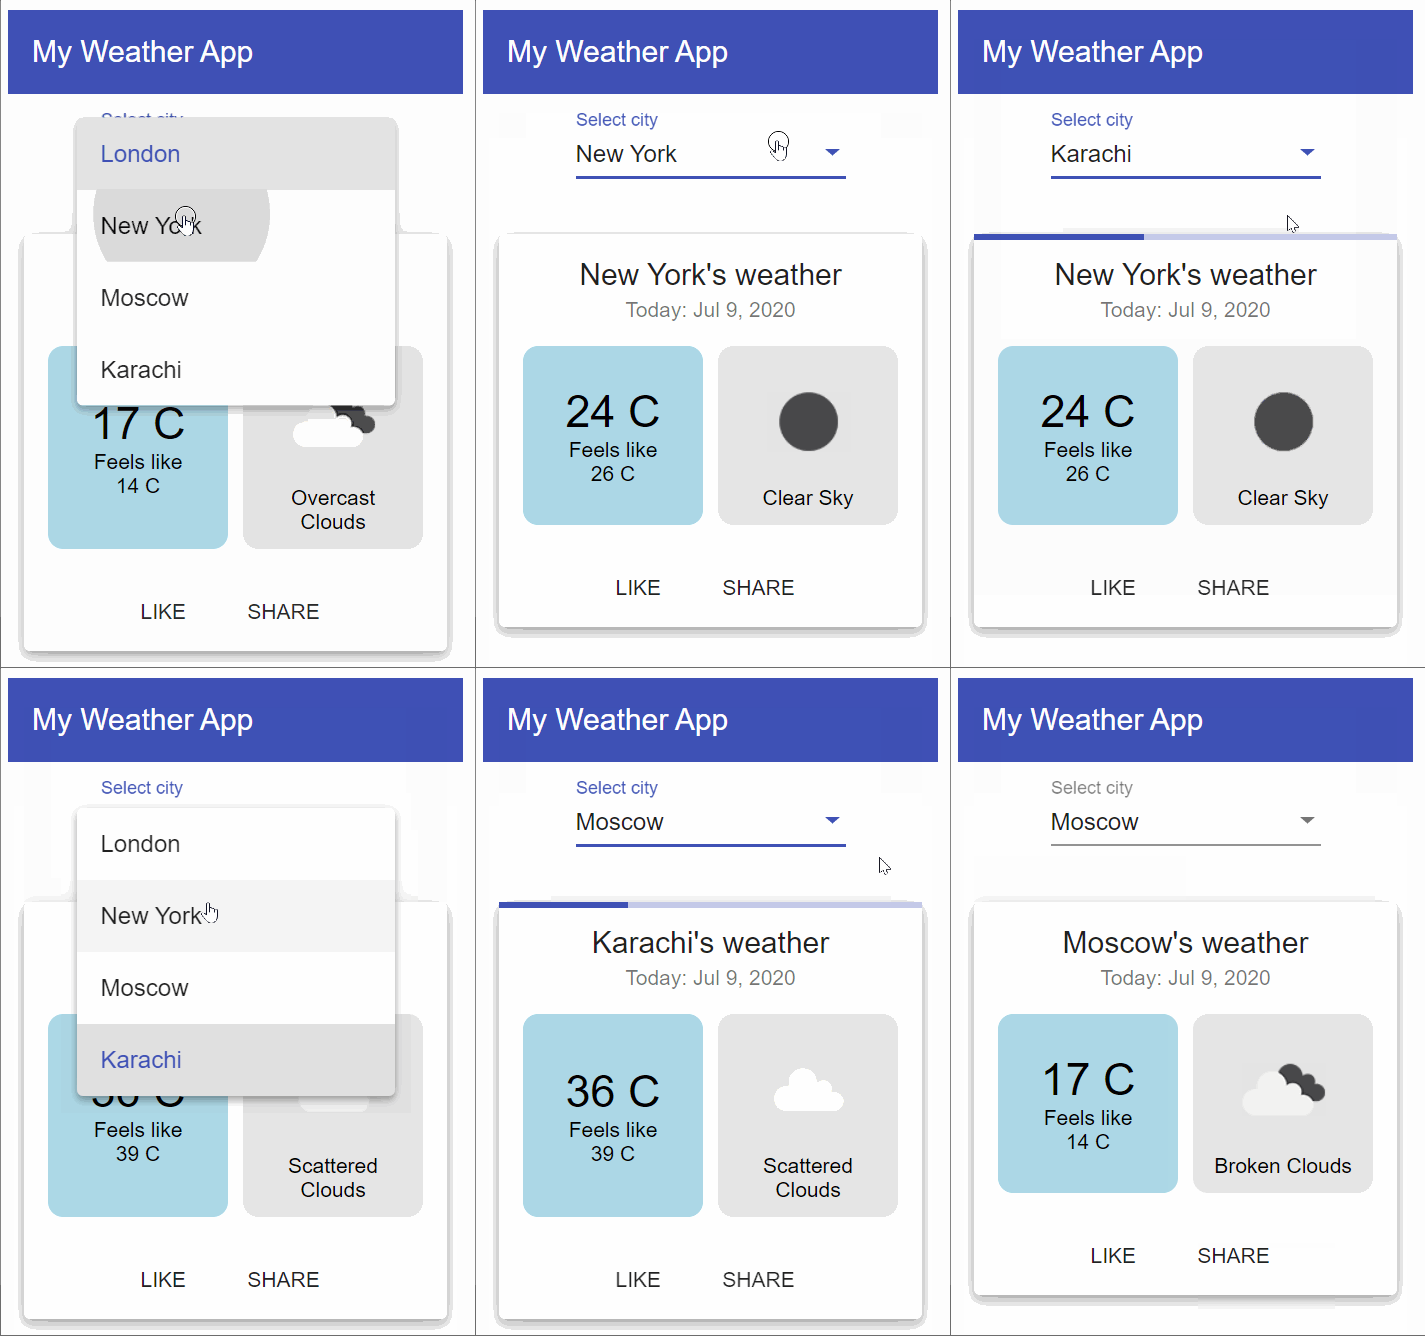
Loader added to RxJS weather app

Bonus: Conditional select fields

Last, but not the least, let's convert our city select control into two selectors: one for country and the other for the city. This is better from a UX perspective, since the user can narrow down the selection by choosing a country first.

How do we achieve this conditional select control? Again, there are multiple ways to do it. Since both our controls expose their values as observables, it is best we look for a way through RxJS. In essence, what we want to do is to link the options for the city select control with the value of the country select control.

Let's first add the country control and change the structure of the data a bit.

@Component({
  selector: "app-root",
  templateUrl: "./app.component.html",
  styleUrls: ["./app.component.scss"],
})
export class AppComponent implements OnInit, OnDestroy {
  countries = [
    {
      name: "United Kingdom",
      cities: ["London", "Warwick", "Birmingham"],
    },
    {
      name: "United States",
      cities: ["New York", "Chicago", "Washington"],
    },
    {
      name: "Australia",
      cities: ["Sydney", "Adelaide", "Melbourne"],
    },
    {
      name: "Pakistan",
      cities: ["Lahore", "Karachi", "Islamabad"],
    },
  ];

  countryControl: FormControl;
  cityControl: FormControl;

  constructor(private router: Router) {}

  ngOnInit() {
    this.cityControl = new FormControl("");
    this.cityControl.valueChanges.subscribe((value) => {
      this.router.navigate([value]);
    });

    this.countryControl = new FormControl("");
  }
}
<div class="content">
  <div class="flex-row">
    <mat-form-field class="mr">
      <mat-label>Select country</mat-label>
      <mat-select [formControl]="countryControl">
        <mat-option *ngFor="let country of countries" [value]="country">
          {{country.name}}
        </mat-option>
      </mat-select>
    </mat-form-field>
    <mat-form-field>
      <mat-label>Select city</mat-label>
      <mat-select [formControl]="cityControl">
        <mat-option *ngFor="let city of ??" [value]="city">
          {{city}}
        </mat-option>
      </mat-select>
    </mat-form-field>
  </div>
</div>

Notice how we don't really know what data to use now to plug in our *ngFor directive for the city select control options. Let's create an Observable called cities$ to refer to this conditional city data. Then we simply need to specify the observable pipeline needed to get this data in the ngOnInit function.

this.cities$ = this.countryControl.valueChanges.pipe(
  map((country) => country.cities)
);

Notice how we're just using the map operator to get the city values from the selected country value. No subscriptions or extra variables required in our code!

To finish up, we just add the missing piece in the template. It is the cities$ observable with the async pipe.

<mat-form-field>
  <mat-label>Select city</mat-label>
  <mat-select [formControl]="cityControl">
    <mat-option *ngFor="let city of cities$ | async" [value]="city">
      {{city}}
    </mat-option>
  </mat-select>
</mat-form-field>

And that's it!

We now have a nice looking conditional select control. If you now select a country, the cities control options will automatically be narrowed down for you. Every other functionality in the app remains the same.
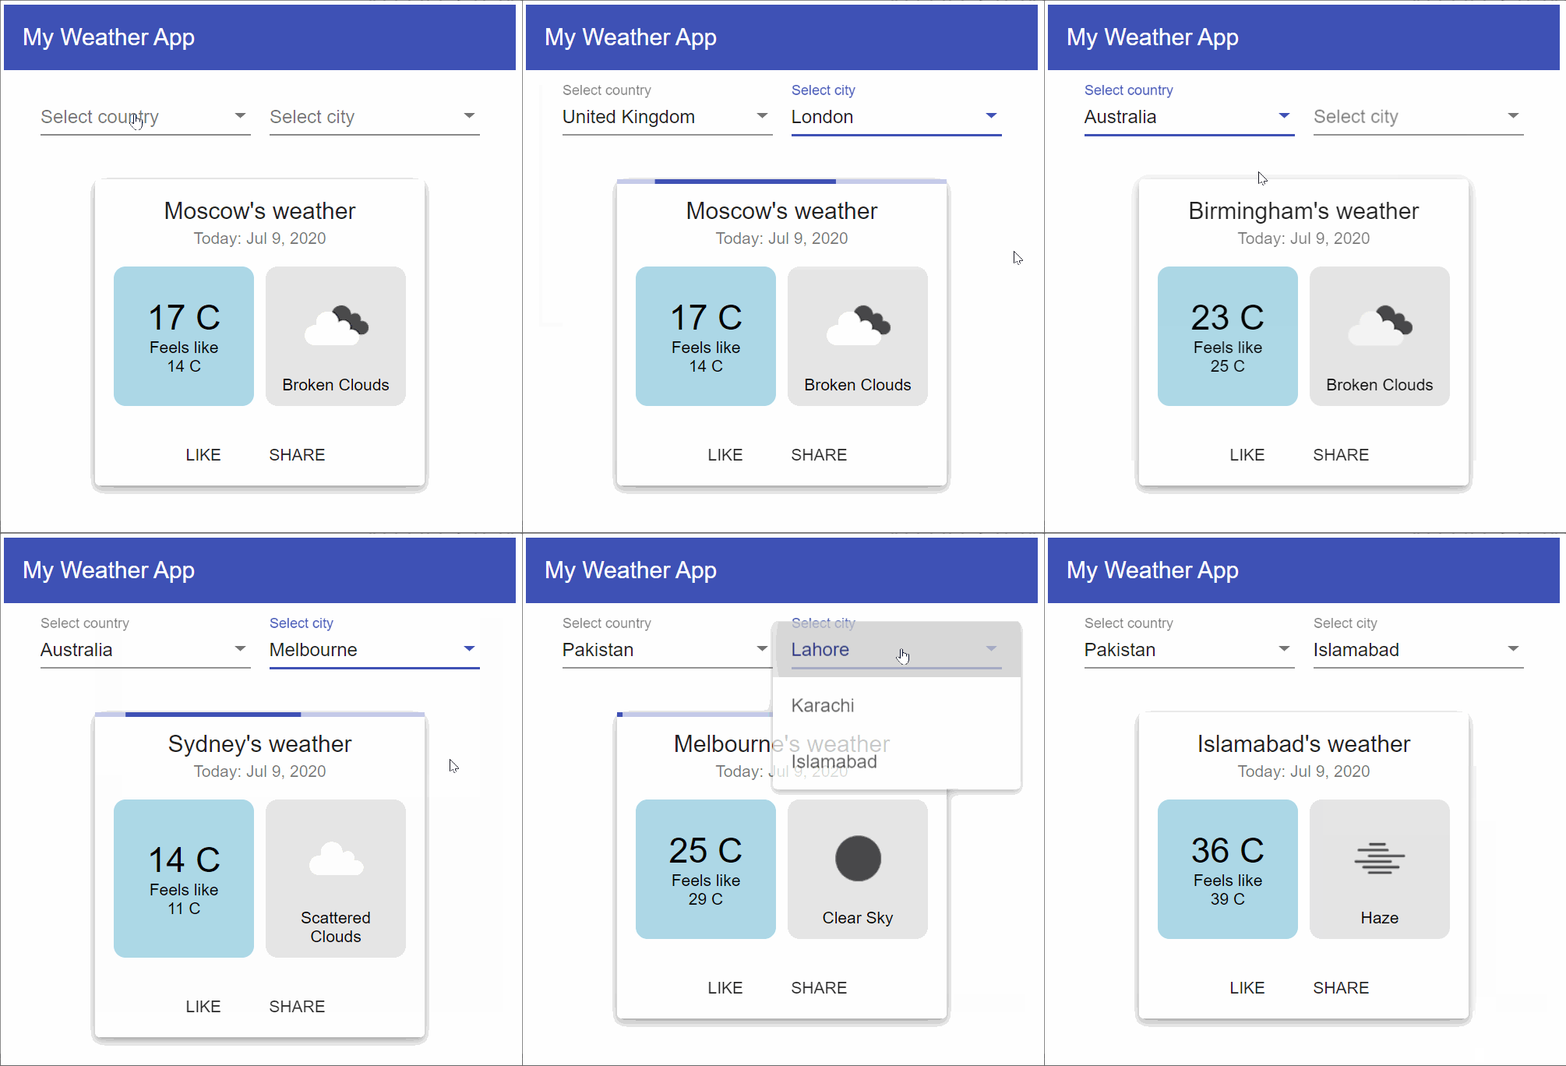
Conditional controls for country and city

Final thoughts

If you've reached this point, Kudos! We just created a simple weather app for ourselves with RxJS in Angular with some bits of technical difficulty. More importantly, we just learnt about how RxJS can be leveraged to its full and how it helps in making our code clean, while developing complex flows easier than it once was!

I hope you go ahead to use the awesome RxJS library in your own projects as well. It just takes some getting used to. Once you start thinking in terms of observables and streams, you'll never want to go back!

The complete code for the app can be found on this github repo.

Thanks for reading!

Bye :)

If you liked this article, you might also like Create a responsive card grid in Angular using Flex Layout!
You may also like...

Loading comments...
observable which we can then use in our template with the `async` pipe. **Hint**: That way, we won't need to subscribe or unsubscribe to anything in our code.\n\nThe **weather-report.component.ts** now looks like this.\n\n```ts\n@Component({\n selector: \"app-weather-report\",\n templateUrl: \"./weather-report.component.html\",\n styleUrls: [\"./weather-report.component.scss\"],\n})\nexport class WeatherReportComponent implements OnInit {\n data$: Observable\u003cany\u003e;\n\n constructor(\n private weatherService: WeatherService,\n private route: ActivatedRoute\n ) {}\n\n ngOnInit() {\n this.data$ = this.route.params.pipe(\n map((params) =\u003e params[\"locationName\"]),\n filter((name) =\u003e !!name),\n concatMap((name) =\u003e this.weatherService.getWeatherForCity(name))\n );\n }\n}\n```\n\nNotice how no callbacks or conditional statements are required! It is all very clean and readable, even for someone looking at the code for the first time.\n\n## Common RxJS Operators\n\nLet's go through each operator and what it does quickly.\n\n**Map** - The map operator is simply used to transform the output from the observable. The function is used to specify the transformation. You can make the transformation as complex or simple as you want.\n\n**Filter** - The filter operator is used to control the flow of the observable according to the condition specified. So in our case e.g. the `locationName` parameter needs to be some valid value (for which we use the double !!) before sending it to the API call. If the value is null or empty, it would simply stop the observable execution.\n\n**ConcatMap** - This operator is called a higher order mapping operator. It allows us to join another observable with the original one in the same sequence. There is a lot more detail about this and similar operators like `switchMap`, `mergeMap` etc. at various other [resources](https://rxjs-dev.firebaseapp.com/guide/operators). For our purposes, any of these will work.\n\nLet's now look at how we've setup the template for our component.\n\n```html\n\u003cmat-card class=\"mat-elevation-z5\" *ngIf=\"data$ | async as data\"\u003e\n \u003cmat-card-header\u003e\n \u003cmat-card-title\u003e{{data.name}}'s weather\u003c/mat-card-title\u003e\n \u003cmat-card-subtitle\u003eToday: {{today | date }}\u003c/mat-card-subtitle\u003e\n \u003c/mat-card-header\u003e\n \u003cmat-card-content\u003e\n \u003cdiv class=\"flex-row\"\u003e\n \u003cdiv class=\"temp\"\u003e\n \u003cspan class=\"big-text\"\u003e{{data.main.temp | number:'0.0-0'}} C\u003c/span\u003e\n \u003cspan\u003eFeels like \u003c/span\u003e\n \u003cspan\u003e{{data.main.feels_like | number: '0.0-0'}} C\u003c/span\u003e\n \u003c/div\u003e\n \u003cdiv class=\"outlook\"\u003e\n \u003cspan\u003e{{data.weather[0].description | titlecase}}\u003c/span\u003e\n \u003c/div\u003e\n \u003c/div\u003e\n \u003c/mat-card-content\u003e\n \u003cmat-card-actions\u003e\n \u003cbutton mat-button\u003eLIKE\u003c/button\u003e\n \u003cbutton mat-button\u003eSHARE\u003c/button\u003e\n \u003c/mat-card-actions\u003e\n\u003c/mat-card\u003e\n```\n\n```scss\n:host {\n display: flex;\n justify-content: center;\n position: relative;\n}\n\n.top-bar {\n position: absolute;\n left: 0;\n top: 0;\n}\n\nmat-card {\n width: 250px;\n}\n\nmat-card::ng-deep.mat-card-header-text {\n width: 100%;\n}\n\n.flex-row {\n display: flex;\n flex-direction: row;\n\n \u003e div {\n flex: 50%;\n border-radius: 10px;\n }\n\n \u003e .outlook {\n padding: 10px;\n color: black;\n background: rgba(0, 0, 0, 0.1);\n }\n\n \u003e .temp {\n background: lightblue;\n padding: 10px;\n color: black;\n margin-right: 10px;\n display: flex;\n flex-direction: column;\n justify-content: center;\n align-items: center;\n }\n\n .big-text {\n font-size: 30px;\n }\n\n .caption {\n text-transform: uppercase;\n font-size: 15px;\n }\n\n .image {\n height: 80px;\n }\n}\n```\n\nWe're using a material card component to bind different items from the data we get from the API. Notice the use of the `data RxJS in Angular: Creating a Weather App | Zoaib Khan
variable with the `async` pipe. The `*ngIf` ensures that the card won't be shown if there is no data. The alias `data` is a useful way to ensure the `async` pipe is only used at one place in the template.\n\nI'm including the CSS file here just for completeness. The styling is pretty standard stuff for those who've done layouts. If you want to know more about this part, see my [companion post](https://zoaibkhan.com/blog/weather-card-design-with-angular-material-and-css/) on how I did it. I'll skip over this for now.\n\nGreat! Now we have a working version of our app as shown below.\n\n![Basic working app in Angular RxJS](/assets/blog/rxjs-in-angular-creating-a-weather-app/weather-app-1.gif)\n\n## Adding the weather icon with RxJS Map\n\nYou might've noticed that the weather icon in the final result is missing. This is because we don't get the url for the icon image in the data. Instead we just get an icon identifier string which can then be used to construct a url.\n\nThere are multiple ways to do this. Let's use RxJS again to make things easier for us. Since we get an observable from the weather service, we can add a **map** transformation within the service, so that we get an image url ready for use in our template. The transformation uses the spread operator to keep everything else the same and just appends an **image** property with our image url.\n\n```ts\ngetWeatherForCity(city: string): Observable\u003cany\u003e {\n const path = `https://api.openweathermap.org/data/2.5/weather?q=${city}\u0026units=metric\u0026APPID=695ed9f29c4599b7544d0db5c211d499`;\n return this.http.get(path).pipe(\n map(data =\u003e ({\n ...data,\n image: `http://openweathermap.org/img/wn/${data.weather[0].icon}@2x.png`\n })),\n );\n }\n```\n\nThen, we simply add an **img** tag in our template right below the outlook text.\n\n```html\n\u003cdiv class=\"outlook\"\u003e\n \u003cimg [src]=\"data.image\" class=\"image\" /\u003e\n \u003cspan\u003e{{data.weather[0].description | titlecase}}\u003c/span\u003e\n\u003c/div\u003e\n```\n\nAnd we've a nice looking icon to show the current weather report in a visual form.\n\n![Weather icon added](/assets/blog/rxjs-in-angular-creating-a-weather-app/image-1.png)\n\nNice touch!\n\n## Adding the loading indicator with RxJS Tap\n\nThe Open Weather Map API is quite snappy. However, on very slow connections, we might still need to give a visual indicator to the user till we get the data. Let's add a material progress bar at the top of the card to serve this purpose.\n\nHow do we control when to show the loader and when to hide it? We'll keep a boolean in our component and use the `tap` operator in RxJS to set it at at different times in our observable pipeline.\n\n```ts\nthis.data$ = this.route.params.pipe(\n map((params) =\u003e params[\"locationName\"]),\n filter((name) =\u003e !!name),\n tap(() =\u003e {\n this.loading = true;\n }),\n concatMap((name) =\u003e this.weatherService.getWeatherForCity(name)),\n tap(() =\u003e {\n this.loading = false;\n })\n);\n```\n\nThe `tap` operator is perfect for cases where we need to specify a \"side effect\" in our observable pipeline. It doesn't change the output or the flow of the observable in any way. So it's well suited for setting status variables like this. The rest of the stream keeps working as it is.\n\nJust to simulate our loading on slower networks, I've added a `delay` operator to the weather service. It will just add a 500ms delay to the observable.\n\n```ts\ngetWeatherForCity(city: string): Observable\u003cany\u003e {\n const path = `https://api.openweathermap.org/data/2.5/weather?q=${city}\u0026units=metric\u0026APPID=695ed9f29c4599b7544d0db5c211d499`;\n return this.http.get(path).pipe(\n map(data =\u003e ({\n ...data,\n image: `http://openweathermap.org/img/wn/${data.weather[0].icon}@2x.png`\n })),\n delay(500)\n );\n }\n```\n\nVery convenient for testing. Here is how the loading indicator looks like now.\n\n![Loader added to RxJS weather app](/assets/blog/rxjs-in-angular-creating-a-weather-app/weather-app-2-3.gif)\n\n## Bonus: Conditional select fields\n\nLast, but not the least, let's convert our city select control into two selectors: one for country and the other for the city. This is better from a UX perspective, since the user can narrow down the selection by choosing a country first.\n\nHow do we achieve this conditional select control? Again, there are multiple ways to do it. Since both our controls expose their values as observables, it is best we look for a way through RxJS. In essence, what we want to do is to link the options for the city select control with the value of the country select control.\n\nLet's first add the country control and change the structure of the data a bit.\n\n```ts\n@Component({\n selector: \"app-root\",\n templateUrl: \"./app.component.html\",\n styleUrls: [\"./app.component.scss\"],\n})\nexport class AppComponent implements OnInit, OnDestroy {\n countries = [\n {\n name: \"United Kingdom\",\n cities: [\"London\", \"Warwick\", \"Birmingham\"],\n },\n {\n name: \"United States\",\n cities: [\"New York\", \"Chicago\", \"Washington\"],\n },\n {\n name: \"Australia\",\n cities: [\"Sydney\", \"Adelaide\", \"Melbourne\"],\n },\n {\n name: \"Pakistan\",\n cities: [\"Lahore\", \"Karachi\", \"Islamabad\"],\n },\n ];\n\n countryControl: FormControl;\n cityControl: FormControl;\n\n constructor(private router: Router) {}\n\n ngOnInit() {\n this.cityControl = new FormControl(\"\");\n this.cityControl.valueChanges.subscribe((value) =\u003e {\n this.router.navigate([value]);\n });\n\n this.countryControl = new FormControl(\"\");\n }\n}\n```\n\n```html\n\u003cdiv class=\"content\"\u003e\n \u003cdiv class=\"flex-row\"\u003e\n \u003cmat-form-field class=\"mr\"\u003e\n \u003cmat-label\u003eSelect country\u003c/mat-label\u003e\n \u003cmat-select [formControl]=\"countryControl\"\u003e\n \u003cmat-option *ngFor=\"let country of countries\" [value]=\"country\"\u003e\n {{country.name}}\n \u003c/mat-option\u003e\n \u003c/mat-select\u003e\n \u003c/mat-form-field\u003e\n \u003cmat-form-field\u003e\n \u003cmat-label\u003eSelect city\u003c/mat-label\u003e\n \u003cmat-select [formControl]=\"cityControl\"\u003e\n \u003cmat-option *ngFor=\"let city of ??\" [value]=\"city\"\u003e\n {{city}}\n \u003c/mat-option\u003e\n \u003c/mat-select\u003e\n \u003c/mat-form-field\u003e\n \u003c/div\u003e\n\u003c/div\u003e\n```\n\nNotice how we don't really know what data to use now to plug in our `*ngFor` directive for the city select control options. Let's create an Observable called `cities RxJS in Angular: Creating a Weather App | Zoaib Khan
to refer to this conditional city data. Then we simply need to specify the observable pipeline needed to get this data in the **ngOnInit** function.\n\n```ts\nthis.cities$ = this.countryControl.valueChanges.pipe(\n map((country) =\u003e country.cities)\n);\n```\n\nNotice how we're just using the `map` operator to get the city values from the selected country value. No subscriptions or extra variables required in our code!\n\nTo finish up, we just add the missing piece in the template. It is the `cities RxJS in Angular: Creating a Weather App | Zoaib Khan
observable with the `async` pipe.\n\n```html\n\u003cmat-form-field\u003e\n \u003cmat-label\u003eSelect city\u003c/mat-label\u003e\n \u003cmat-select [formControl]=\"cityControl\"\u003e\n \u003cmat-option *ngFor=\"let city of cities$ | async\" [value]=\"city\"\u003e\n {{city}}\n \u003c/mat-option\u003e\n \u003c/mat-select\u003e\n\u003c/mat-form-field\u003e\n```\n\nAnd that's it!\n\nWe now have a nice looking conditional select control. If you now select a country, the cities control options will automatically be narrowed down for you. Every other functionality in the app remains the same.\n\n![Conditional controls for country and city](/assets/blog/rxjs-in-angular-creating-a-weather-app/weather-app-3.gif)\n\n## Final thoughts\n\nIf you've reached this point, Kudos! We just created a simple weather app for ourselves with RxJS in Angular with some bits of technical difficulty. More importantly, we just learnt about how RxJS can be leveraged to its full and how it helps in making our code clean, while developing complex flows easier than it once was!\n\nI hope you go ahead to use the awesome RxJS library in your own projects as well. It just takes some getting used to. Once you start thinking in terms of observables and streams, you'll never want to go back!\n\nThe complete code for the app can be found on this [github repo](https://github.com/thisiszoaib/rxjs-angular-weather).\n\nThanks for reading!\n\nBye :)\n\nIf you liked this article, you might also like [Create a responsive card grid in Angular using Flex Layout](https://zoaibkhan.com/blog/create-a-responsive-card-grid-in-angular-using-flex-layout-part-1/)!\n","ogImage":{"url":"/assets/blog/rxjs-in-angular-creating-a-weather-app/Weather-app.png"},"coverImage":"/assets/blog/rxjs-in-angular-creating-a-weather-app/Weather-app.png","description":"Get introduced to the RxJS library by creating a simple weather app in Angular and using common RxJS operators","tags":["angular","css","html","javascript","programming","reactive","rxjs","weather"],"categories":["RxJS"],"readingTime":12.595,"markdown":"\nRxJS in Angular can seem a bit difficult at first. But once you learn to leverage its power, it makes your code cleaner and more readable!\n\nIn this article, I'm going to walk you through developing a simple weather app in Angular and in the process (hopefully!) give you an overview of the most commonly used RxJS features.\n\nThe final result is shown below.\n\n![Final weather app](/assets/blog/rxjs-in-angular-creating-a-weather-app/weather-app-final.gif)\n\nOur final weather app using RxJS\n\n_Haven't heard about RxJS?_ It is a Javascript library used to handle asynchronous events and flows emanating from them. Think network calls, notifications and user events. All of these can happen at different times in our apps and RxJS provides us with tools to handle these observable streams, compose them, mix and match to give us the results that we want!\n\nRead more about them [here](https://rxjs-dev.firebaseapp.com/guide/overview).\n\nOk, let's kick off our project!\n\n## Preparing the project\n\nFor the weather app, we just need a simple Angular project, with the Angular Material components library included. This can be achieved by running these commands.\n\n```shell\nng new weather-app\nng add @angular/material\n```\n\nThe layout of the app is quite simple. We add a material select component in the **app.component.html** file. Then, we have its corresponding code representing names of cities in the **app.component.ts** file.\n\n```html\n\u003cmat-toolbar color=\"primary\"\u003e My Weather App \u003c/mat-toolbar\u003e\n\u003cdiv class=\"content\"\u003e\n \u003cmat-form-field\u003e\n \u003cmat-label\u003eSelect city\u003c/mat-label\u003e\n \u003cmat-select [formControl]=\"cityControl\"\u003e\n \u003cmat-option *ngFor=\"let city of cities\" [value]=\"city\"\u003e\n {{city}}\n \u003c/mat-option\u003e\n \u003c/mat-select\u003e\n \u003c/mat-form-field\u003e\n \u003cbr /\u003e\n \u003crouter-outlet\u003e\u003c/router-outlet\u003e\n\u003c/div\u003e\n```\n\n```ts\n@Component({\n selector: \"app-root\",\n templateUrl: \"./app.component.html\",\n styleUrls: [\"./app.component.scss\"],\n})\nexport class AppComponent implements OnInit, OnDestroy {\n cities = [\"London\", \"Paris\", \"Moscow\", \"New York\", \"Karachi\", \"Sydney\"];\n\n cityControl: FormControl;\n\n constructor(private router: Router) {}\n\n ngOnInit() {\n this.cityControl = new FormControl(\"\");\n this.cityControl.valueChanges.subscribe((value) =\u003e {\n this.router.navigate([value]);\n });\n }\n\n ngOnDestroy() {}\n}\n```\n\nSimple enough? Our select control takes its option values from a simple string array we define here.\n\nWhat should happen when a city is selected? Since the reactive forms in Angular provide us an observable out of the box to listen to changes in the select control, we just **subscribe** to the observable to navigate to a route.\n\n\u003e Any observable needs to be subscribed to in order for it to execute. This subscription can happen in code as we're doing here. OR in a better way, on the template using the 'async' pipe. We'll come to that in a bit!\n\nTalking about routes, we've added a **router-outlet** in the template file. And if we look at our **app.module.ts**, we define our routes like this.\n\n```ts\nconst routes: Routes = [\n {\n path: \"\",\n component: WeatherReportComponent,\n },\n {\n path: \":locationName\",\n component: WeatherReportComponent,\n },\n];\n```\n\nI'll be coming to the Weather Report Component in a bit (since that contains our core functionality). But here all you need to see is the routing configuration that we've setup. The `locationName` parameter will be used in our weather report component to fetch the weather data.\n\n## Basic flow of the app\n\nYou might have already figured out by now. But just to be clear, the basic flow will be something like this:\n\n- User selects the city\n- The app will be routed to the correct route with the city name\n- Our weather report component will use the city name and fetch weather data, displaying it on the card\n\n## Open Weather API and the weather service\n\nWe'll be using the Open Weather Map API to fetch the data about the current forecast in our city of choice. It is a free API for the most part. More details about the different options for their API are available on their [website](https://openweathermap.org/api).\n\nTo add better structure to our app, let's encapsulate the API call in a weather service component.\n\n```ts\n@Injectable({ providedIn: \"root\" })\nexport class WeatherService {\n constructor(private http: HttpClient) {}\n\n getWeatherForCity(city: string): Observable\u003cany\u003e {\n const path = `https://api.openweathermap.org/data/2.5/weather?q=${city}\u0026units=metric\u0026APPID=695ed9f29c4599b7544d0db5c211d499`;\n return this.http.get(path);\n }\n}\n```\n\nThis is quite self explanatory! Our function takes in a city name and just returns an observable from the HttpClient GET call.\n\n_Note: This is the second time we're seeing an Observable again. Wherever we have an observable, we've a good opportunity to utilize RxJS._\n\nOur app now looks like this.\n\n![The city dropdown control](/assets/blog/rxjs-in-angular-creating-a-weather-app/image.png)\n\nLooks like the basics are setup! Let's go ahead and add our main functionality which is the weather report component.\n\n## Building an RxJS Observable stream\n\nWe use operators in RxJS to manipulate or change our observable streams. There are a whole host of them available! But, don't worry. We don't need to know all of them. In practice, only a few will suffice for your needs (you can always catch up on the others as you go along).\n\nSince we already know we're receiving the location name in the form of route parameters, let us start from there.\n\nNote that our routeParams are also an observable!\n\n```ts\n@Component({\n selector: \"app-weather-report\",\n templateUrl: \"./weather-report.component.html\",\n styleUrls: [\"./weather-report.component.scss\"],\n})\nexport class WeatherReportComponent implements OnInit {\n constructor(\n private weatherService: WeatherService,\n private route: ActivatedRoute\n ) {}\n\n ngOnInit() {\n // Our route params observable\n this.route.params;\n }\n}\n```\n\nMost beginners would **subscribe** to this observable and try to use the param value. But there is a better way to go about this! Let's first see what we actually want to do.\n\n1. Get the `locationName` parameter from the route params\n2. Check if the parameter has some value\n3. Call our weather service function for this value\n4. Store the value somewhere so it can be used in our template\n\nHere is how we can use RxJS for each of them.\n\n1. Use the `map` operator to transform the params object into our parameter\n2. Use the `filter` operator to check if we have a valid value\n3. Use a `concatMap` operator to append or concatenate our service function (which also is an observable, remember?)\n4. Directly assign this observable chain to a `data RxJS in Angular: Creating a Weather App | Zoaib Khan
observable which we can then use in our template with the `async` pipe. **Hint**: That way, we won't need to subscribe or unsubscribe to anything in our code.\n\nThe **weather-report.component.ts** now looks like this.\n\n```ts\n@Component({\n selector: \"app-weather-report\",\n templateUrl: \"./weather-report.component.html\",\n styleUrls: [\"./weather-report.component.scss\"],\n})\nexport class WeatherReportComponent implements OnInit {\n data$: Observable\u003cany\u003e;\n\n constructor(\n private weatherService: WeatherService,\n private route: ActivatedRoute\n ) {}\n\n ngOnInit() {\n this.data$ = this.route.params.pipe(\n map((params) =\u003e params[\"locationName\"]),\n filter((name) =\u003e !!name),\n concatMap((name) =\u003e this.weatherService.getWeatherForCity(name))\n );\n }\n}\n```\n\nNotice how no callbacks or conditional statements are required! It is all very clean and readable, even for someone looking at the code for the first time.\n\n## Common RxJS Operators\n\nLet's go through each operator and what it does quickly.\n\n**Map** - The map operator is simply used to transform the output from the observable. The function is used to specify the transformation. You can make the transformation as complex or simple as you want.\n\n**Filter** - The filter operator is used to control the flow of the observable according to the condition specified. So in our case e.g. the `locationName` parameter needs to be some valid value (for which we use the double !!) before sending it to the API call. If the value is null or empty, it would simply stop the observable execution.\n\n**ConcatMap** - This operator is called a higher order mapping operator. It allows us to join another observable with the original one in the same sequence. There is a lot more detail about this and similar operators like `switchMap`, `mergeMap` etc. at various other [resources](https://rxjs-dev.firebaseapp.com/guide/operators). For our purposes, any of these will work.\n\nLet's now look at how we've setup the template for our component.\n\n```html\n\u003cmat-card class=\"mat-elevation-z5\" *ngIf=\"data$ | async as data\"\u003e\n \u003cmat-card-header\u003e\n \u003cmat-card-title\u003e{{data.name}}'s weather\u003c/mat-card-title\u003e\n \u003cmat-card-subtitle\u003eToday: {{today | date }}\u003c/mat-card-subtitle\u003e\n \u003c/mat-card-header\u003e\n \u003cmat-card-content\u003e\n \u003cdiv class=\"flex-row\"\u003e\n \u003cdiv class=\"temp\"\u003e\n \u003cspan class=\"big-text\"\u003e{{data.main.temp | number:'0.0-0'}} C\u003c/span\u003e\n \u003cspan\u003eFeels like \u003c/span\u003e\n \u003cspan\u003e{{data.main.feels_like | number: '0.0-0'}} C\u003c/span\u003e\n \u003c/div\u003e\n \u003cdiv class=\"outlook\"\u003e\n \u003cspan\u003e{{data.weather[0].description | titlecase}}\u003c/span\u003e\n \u003c/div\u003e\n \u003c/div\u003e\n \u003c/mat-card-content\u003e\n \u003cmat-card-actions\u003e\n \u003cbutton mat-button\u003eLIKE\u003c/button\u003e\n \u003cbutton mat-button\u003eSHARE\u003c/button\u003e\n \u003c/mat-card-actions\u003e\n\u003c/mat-card\u003e\n```\n\n```scss\n:host {\n display: flex;\n justify-content: center;\n position: relative;\n}\n\n.top-bar {\n position: absolute;\n left: 0;\n top: 0;\n}\n\nmat-card {\n width: 250px;\n}\n\nmat-card::ng-deep.mat-card-header-text {\n width: 100%;\n}\n\n.flex-row {\n display: flex;\n flex-direction: row;\n\n \u003e div {\n flex: 50%;\n border-radius: 10px;\n }\n\n \u003e .outlook {\n padding: 10px;\n color: black;\n background: rgba(0, 0, 0, 0.1);\n }\n\n \u003e .temp {\n background: lightblue;\n padding: 10px;\n color: black;\n margin-right: 10px;\n display: flex;\n flex-direction: column;\n justify-content: center;\n align-items: center;\n }\n\n .big-text {\n font-size: 30px;\n }\n\n .caption {\n text-transform: uppercase;\n font-size: 15px;\n }\n\n .image {\n height: 80px;\n }\n}\n```\n\nWe're using a material card component to bind different items from the data we get from the API. Notice the use of the `data RxJS in Angular: Creating a Weather App | Zoaib Khan
variable with the `async` pipe. The `*ngIf` ensures that the card won't be shown if there is no data. The alias `data` is a useful way to ensure the `async` pipe is only used at one place in the template.\n\nI'm including the CSS file here just for completeness. The styling is pretty standard stuff for those who've done layouts. If you want to know more about this part, see my [companion post](https://zoaibkhan.com/blog/weather-card-design-with-angular-material-and-css/) on how I did it. I'll skip over this for now.\n\nGreat! Now we have a working version of our app as shown below.\n\n![Basic working app in Angular RxJS](/assets/blog/rxjs-in-angular-creating-a-weather-app/weather-app-1.gif)\n\n## Adding the weather icon with RxJS Map\n\nYou might've noticed that the weather icon in the final result is missing. This is because we don't get the url for the icon image in the data. Instead we just get an icon identifier string which can then be used to construct a url.\n\nThere are multiple ways to do this. Let's use RxJS again to make things easier for us. Since we get an observable from the weather service, we can add a **map** transformation within the service, so that we get an image url ready for use in our template. The transformation uses the spread operator to keep everything else the same and just appends an **image** property with our image url.\n\n```ts\ngetWeatherForCity(city: string): Observable\u003cany\u003e {\n const path = `https://api.openweathermap.org/data/2.5/weather?q=${city}\u0026units=metric\u0026APPID=695ed9f29c4599b7544d0db5c211d499`;\n return this.http.get(path).pipe(\n map(data =\u003e ({\n ...data,\n image: `http://openweathermap.org/img/wn/${data.weather[0].icon}@2x.png`\n })),\n );\n }\n```\n\nThen, we simply add an **img** tag in our template right below the outlook text.\n\n```html\n\u003cdiv class=\"outlook\"\u003e\n \u003cimg [src]=\"data.image\" class=\"image\" /\u003e\n \u003cspan\u003e{{data.weather[0].description | titlecase}}\u003c/span\u003e\n\u003c/div\u003e\n```\n\nAnd we've a nice looking icon to show the current weather report in a visual form.\n\n![Weather icon added](/assets/blog/rxjs-in-angular-creating-a-weather-app/image-1.png)\n\nNice touch!\n\n## Adding the loading indicator with RxJS Tap\n\nThe Open Weather Map API is quite snappy. However, on very slow connections, we might still need to give a visual indicator to the user till we get the data. Let's add a material progress bar at the top of the card to serve this purpose.\n\nHow do we control when to show the loader and when to hide it? We'll keep a boolean in our component and use the `tap` operator in RxJS to set it at at different times in our observable pipeline.\n\n```ts\nthis.data$ = this.route.params.pipe(\n map((params) =\u003e params[\"locationName\"]),\n filter((name) =\u003e !!name),\n tap(() =\u003e {\n this.loading = true;\n }),\n concatMap((name) =\u003e this.weatherService.getWeatherForCity(name)),\n tap(() =\u003e {\n this.loading = false;\n })\n);\n```\n\nThe `tap` operator is perfect for cases where we need to specify a \"side effect\" in our observable pipeline. It doesn't change the output or the flow of the observable in any way. So it's well suited for setting status variables like this. The rest of the stream keeps working as it is.\n\nJust to simulate our loading on slower networks, I've added a `delay` operator to the weather service. It will just add a 500ms delay to the observable.\n\n```ts\ngetWeatherForCity(city: string): Observable\u003cany\u003e {\n const path = `https://api.openweathermap.org/data/2.5/weather?q=${city}\u0026units=metric\u0026APPID=695ed9f29c4599b7544d0db5c211d499`;\n return this.http.get(path).pipe(\n map(data =\u003e ({\n ...data,\n image: `http://openweathermap.org/img/wn/${data.weather[0].icon}@2x.png`\n })),\n delay(500)\n );\n }\n```\n\nVery convenient for testing. Here is how the loading indicator looks like now.\n\n![Loader added to RxJS weather app](/assets/blog/rxjs-in-angular-creating-a-weather-app/weather-app-2-3.gif)\n\n## Bonus: Conditional select fields\n\nLast, but not the least, let's convert our city select control into two selectors: one for country and the other for the city. This is better from a UX perspective, since the user can narrow down the selection by choosing a country first.\n\nHow do we achieve this conditional select control? Again, there are multiple ways to do it. Since both our controls expose their values as observables, it is best we look for a way through RxJS. In essence, what we want to do is to link the options for the city select control with the value of the country select control.\n\nLet's first add the country control and change the structure of the data a bit.\n\n```ts\n@Component({\n selector: \"app-root\",\n templateUrl: \"./app.component.html\",\n styleUrls: [\"./app.component.scss\"],\n})\nexport class AppComponent implements OnInit, OnDestroy {\n countries = [\n {\n name: \"United Kingdom\",\n cities: [\"London\", \"Warwick\", \"Birmingham\"],\n },\n {\n name: \"United States\",\n cities: [\"New York\", \"Chicago\", \"Washington\"],\n },\n {\n name: \"Australia\",\n cities: [\"Sydney\", \"Adelaide\", \"Melbourne\"],\n },\n {\n name: \"Pakistan\",\n cities: [\"Lahore\", \"Karachi\", \"Islamabad\"],\n },\n ];\n\n countryControl: FormControl;\n cityControl: FormControl;\n\n constructor(private router: Router) {}\n\n ngOnInit() {\n this.cityControl = new FormControl(\"\");\n this.cityControl.valueChanges.subscribe((value) =\u003e {\n this.router.navigate([value]);\n });\n\n this.countryControl = new FormControl(\"\");\n }\n}\n```\n\n```html\n\u003cdiv class=\"content\"\u003e\n \u003cdiv class=\"flex-row\"\u003e\n \u003cmat-form-field class=\"mr\"\u003e\n \u003cmat-label\u003eSelect country\u003c/mat-label\u003e\n \u003cmat-select [formControl]=\"countryControl\"\u003e\n \u003cmat-option *ngFor=\"let country of countries\" [value]=\"country\"\u003e\n {{country.name}}\n \u003c/mat-option\u003e\n \u003c/mat-select\u003e\n \u003c/mat-form-field\u003e\n \u003cmat-form-field\u003e\n \u003cmat-label\u003eSelect city\u003c/mat-label\u003e\n \u003cmat-select [formControl]=\"cityControl\"\u003e\n \u003cmat-option *ngFor=\"let city of ??\" [value]=\"city\"\u003e\n {{city}}\n \u003c/mat-option\u003e\n \u003c/mat-select\u003e\n \u003c/mat-form-field\u003e\n \u003c/div\u003e\n\u003c/div\u003e\n```\n\nNotice how we don't really know what data to use now to plug in our `*ngFor` directive for the city select control options. Let's create an Observable called `cities RxJS in Angular: Creating a Weather App | Zoaib Khan
to refer to this conditional city data. Then we simply need to specify the observable pipeline needed to get this data in the **ngOnInit** function.\n\n```ts\nthis.cities$ = this.countryControl.valueChanges.pipe(\n map((country) =\u003e country.cities)\n);\n```\n\nNotice how we're just using the `map` operator to get the city values from the selected country value. No subscriptions or extra variables required in our code!\n\nTo finish up, we just add the missing piece in the template. It is the `cities RxJS in Angular: Creating a Weather App | Zoaib Khan
observable with the `async` pipe.\n\n```html\n\u003cmat-form-field\u003e\n \u003cmat-label\u003eSelect city\u003c/mat-label\u003e\n \u003cmat-select [formControl]=\"cityControl\"\u003e\n \u003cmat-option *ngFor=\"let city of cities$ | async\" [value]=\"city\"\u003e\n {{city}}\n \u003c/mat-option\u003e\n \u003c/mat-select\u003e\n\u003c/mat-form-field\u003e\n```\n\nAnd that's it!\n\nWe now have a nice looking conditional select control. If you now select a country, the cities control options will automatically be narrowed down for you. Every other functionality in the app remains the same.\n\n![Conditional controls for country and city](/assets/blog/rxjs-in-angular-creating-a-weather-app/weather-app-3.gif)\n\n## Final thoughts\n\nIf you've reached this point, Kudos! We just created a simple weather app for ourselves with RxJS in Angular with some bits of technical difficulty. More importantly, we just learnt about how RxJS can be leveraged to its full and how it helps in making our code clean, while developing complex flows easier than it once was!\n\nI hope you go ahead to use the awesome RxJS library in your own projects as well. It just takes some getting used to. Once you start thinking in terms of observables and streams, you'll never want to go back!\n\nThe complete code for the app can be found on this [github repo](https://github.com/thisiszoaib/rxjs-angular-weather).\n\nThanks for reading!\n\nBye :)\n\nIf you liked this article, you might also like [Create a responsive card grid in Angular using Flex Layout](https://zoaibkhan.com/blog/create-a-responsive-card-grid-in-angular-using-flex-layout-part-1/)!\n"},"similarPosts":[{"title":"How to upgrade to the new Angular Typed Forms!","date":"2022-08-25","slug":"how-to-upgrade-to-the-new-angular-typed-forms","coverImage":"/assets/blog/how-to-upgrade-to-the-new-angular-typed-forms/Typed-Forms-1.jpg","excerpt":"Angular 14 was an exciting release because it finally brought out Typed Forms. But how do we go about using them? In this article, I’ll show you exactly how to do it along with some tips and tricks to make your form code better.","tags":["angular","forms","reactive forms"]},{"title":"Create a Simple Contacts App with Angular Signals (1/2)","date":"2023-05-24","slug":"create-simple-contacts-app-with-angular-signals-1","coverImage":"/assets/blog/create-simple-contacts-app-with-angular-signals/signals-crud.jpg","excerpt":"The Angular team has introduced a set of new reactive primitives in v16 called Signals. In this article, I'm going to introduce you to the concept of Angular Signals and we're going to build up a simple contacts app using signals and material components!","tags":["angular","signals","reactivity","crud"]},{"title":"How to add Async Validation to Angular Reactive Forms","date":"2021-10-04","slug":"how-to-add-async-validation-to-angular-reactive-forms","coverImage":"/assets/blog/how-to-add-async-validation-to-angular-reactive-forms/Async-Validation.jpg","excerpt":"In this article, we'll learn how to add async validation to your Angular reactive forms.","tags":["angular","async","forms","material","reactive","validations"]}],"courses":[{"id":"angular-sign-up","title":"Angular Firebase Authentication: Create Full Sign Up App","image":"/assets/courses/angular-sign-up/cover.jpg","description":"Use Angular 16, Angular Material and Firebase Authentication, Firestore and Storage to create a complete Sign Up App!","link":"https://www.udemy.com/course/angular-firebase-authentication-create-full-sign-up-app/?couponCode=432F767C6A2D86ADC29E","rating":4.8}]}},"page":"/blog/[slug]","query":{"slug":"rxjs-in-angular-creating-a-weather-app"},"buildId":"5a98a686-5610-4f01-9962-26b156e9ea29","isFallback":false,"gsp":true,"__vinext":{"hasRewrites":false,"pageModuleUrl":"/_next/static/chunks/_slug_-pegi2sia.js","appModuleUrl":"/_next/static/chunks/_app-pnKqisfa.js","hasMiddleware":false,"routeUrl":"/blog/rxjs-in-angular-creating-a-weather-app/"}}