
How to add Async Validation to Angular Reactive Forms
In this article, we'll learn how to add async validation to your Angular reactive forms.
Video tutorial
We'll build an email input field - which shows up validations when the user focuses away from it. We want the email field to show errors when it is empty, when it is not in the correct format and also when the email entered has already been registered i.e. is not unique.
Our final result will be something like this.
Synchronous vs Asynchronous Validation
If you've worked with Angular forms even a little bit, you'll already know about how to add validators to check for format, required state etc. These validators are called synchronous validators in the Angular world, because they return the validation result immediately after a change is made in the form.
Asynchronous validators, on the other hand, do not return the validation result immediately. They instead give back an Observable of the validation result and return with the value only after some asynchronous process has completed. This is typically a network API call.
In our email validation case, we need to make a network call to check whether this email is already registered. So this is an async validation since we need to wait for the network call before we can inform the user about the validity of the angular form.
Setting up the project
With that out of the way, let's get started and see how exactly how we can build this.
So, first we create a new project and add the angular material library to it using the Angular CLI.
ng new angular-async-validation
ng add @angular/material
Once our installation is complete, we'll just include the modules we need in our app module. We'll need the form field, input and the progress spinner module. Also, since we'll be using reactive forms, let's also include the reactive forms module.
...
import { MatToolbarModule } from '@angular/material/toolbar';
import { MatFormFieldModule } from '@angular/material/form-field';
import { MatInputModule } from '@angular/material/input';
import { MatProgressSpinnerModule } from '@angular/material/progress-spinner';
import { ReactiveFormsModule } from '@angular/forms';

@NgModule({
  declarations: [AppComponent],
  imports: [
    BrowserModule,
    BrowserAnimationsModule,
    MatToolbarModule,
    MatFormFieldModule,
    MatInputModule,
    MatProgressSpinnerModule,
    ReactiveFormsModule,
  ],
  providers: [],
  bootstrap: [AppComponent],
})
export class AppModule {}
Defining our FormControl
Since in reactive forms, we keep our form control definition in the component file, let's do that now. We'll go in app component and define a new emailControl. This will be a FormControl with an initial value of "".
The second parameter in the creation of a FormControl allows us to set our control options. This will have validators (referring to synchronous validators) and async validators.
Let's first, add the synchronous validators - we'll add Validators.required (meaning the field can't be empty) and Validators.email (meaning the field has to have a valid email format). Now these validators were built in validators, so we didn't need to define them first.
emailControl = new FormControl("", {
  validators: [Validators.required, Validators.email],
  asyncValidators: [],
});
For our async validator though since it is a custom validator, we'll need to define it ourselves.
Check out my other article on Angular Content Projection here.
Creating a mock API service
First, we need a service which can perform the network call needed for this. Since we don't actually have an API, we're just going to build a dummy one right now.
Let's create a new service with the Angular CLI.
ng generate service services/user
We'll add an emailExists function in our newly created service.
emailExists(email: string): Observable<boolean> {
    return of(email).pipe(
      delay(500),
      map((email) => {
        const emails = ['consult@zoaibkhan.com', 'zoaib@gmail.com'];
        return emails.includes(email);
      })
    );
  }
The function here simulates a network call. It takes in our email value and checks it against some hardcoded values and if they match it says the email exists otherwise it says no, the email is unique. Of course, we also added a slight delay, so that it behaves like an API call would.
Great! So we have a service which we can use. Now we just need to define our custom Async Validator. Since our Async Validator has to use a service, it makes sense to keep it encapsulated in a service as well. So let's use the same user service to define our async validator function.
Adding the Async Validator Function
We'll define a function called uniqueEmailValidator with the return type of AsyncValidatorFn.
uniqueEmailValidator(): AsyncValidatorFn {
    return (control: AbstractControl): Observable<ValidationErrors | null> => {
      return this.emailExists(control.value).pipe(
        map((exists) => (exists ? { emailExists: true } : null)),
        catchError((err) => null)
      );
    };
}
Inside of it, we'll simply call the emailExists function and add a pipe with a map operator to it. We'll get our exists returned here, so we'll check it. If it does exist, we'll return an object with a key of emailExists and value of true. This is what is referred to as the ValidationError object.
The ValidationError object simply contains a key value pair describing the error. In most cases, we'll only need a key to return which kind of error it is. In more advanced cases, we might need the error message in the value instead of a boolean.
If the email does not exist, we'll just return null, which means there will be no validation error due to this.
Simple enough, right?
So now that we have our Async Validator function defined, let's add it to our FormControl definition.
constructor(private userService: UserService) {}

emailControl = new FormControl('', {
    validators: [Validators.required, Validators.email],
    asyncValidators: [this.userService.uniqueEmailValidator()],

  });
Great, all of this is setup!
Adding the email control to our template
Now all we have to do is to create our control in the template file.
<div class="container">
<mat-form-field [appearance]="'fill'">
<mat-label>Email address</mat-label>
<input matInput [formControl]="emailControl" />
<mat-error *ngIf="emailControl.errors?.required"
>An email is required</mat-error
>
<mat-error *ngIf="emailControl.errors?.email">
Please enter a valid email address
</mat-error>
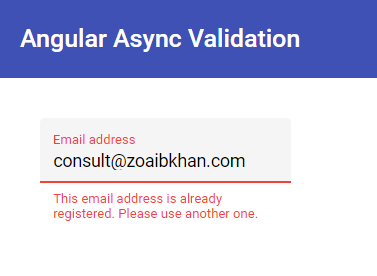
<mat-error *ngIf="emailControl.errors?.emailExists">
This email address is already registered. Please use another one.
</mat-error>
</mat-form-field>
</div>
We've added a new mat-form-field with the appearance of "fill", a label saying 'Email address' and an input element inside of it. Remember to give the input a directive of matInput and the formControl - binding our control definition to this field.
Lastly, we added error messages to our form field with *ngIf directives linking them with the correct error key in the errors object.
For our custom async validation, we'll check for emailExists key - since we used the same in our Validator function.
Great, let's test all of this out now with ng serve.
Testing it all out
We'll test the following cases when the field
- is empty: PASSED (shows the correct validation error)
- does not have a correctly formatted email address: PASSED (shows the correct error)
- has an email address that already exists: PASSED (shows our async validation error)
- has a unique email: PASSED (shows no error)
At this point we have a pretty functional email control with the required validations. But we need to add a few tweaks to make it better!
Adding a Loading Indicator
So all this seems to work well, but you'll notice we have a slight delay when async validation is in progress on our Angular form. The user doesn't get any visual indication of the same which might lead him to think there is no error.
It turns out a FormControl which has an an asynchronous validation in progress provides a flag called pending so that we can display some visual indicator during that time. In our case, the mat-input lets us add a suffix to our input. Let's add a material progress spinner there.
<mat-form-field [appearance]="'fill'">
  ...
  <mat-progress-spinner
    matSuffix
    [mode]="'indeterminate'"
    [diameter]="20"
    *ngIf="emailControl.pending"
  >
  </mat-progress-spinner>
</mat-form-field>
We've added a mat-progress-spinner here with the matSuffix directive to it. We'll keep the spinner mode as indeterminate and the diameter as 20px. Lastly, we just added an ngIf checking for the emailControl's pending flag - so that it only shows up when the async validation is in process.
Great, let's test this out.
Nice, now the user knows when the control is waiting for some network call to validate and can wait as well.
Validating only on control blur event
One last issue we need to fix here is that the async validation starts calling our API as soon as all the synchronous validators pass without waiting for our typing to complete. This is incorrect because it will cause lots of unnecessary API calls.
One way to fix this is to change the updateOn property for our control.
The updateOn property tells Angular when to propagate the change. It can be set to onChange (the default) and onBlur - meaning the change events and validations will only fire when the user focuses away from the input text.
This will be a better fit for our async validation, so we'll set this in our FormControl options.
emailControl = new FormControl("", {
  validators: [Validators.required, Validators.email],
  asyncValidators: [this.userService.uniqueEmailValidator()],
  updateOn: "blur",
});
Let's test this out finally.
So you can see now, the validations only fire when we click outside the control, ensuring that we don't get multiple calls.
Conclusion
So that's all there is to it. We added both synchronous and asynchronous validations to our email control field and tested it out, adding a few visual and other tweaks along the way!
We can very well use this in a real world large form for our purposes.
I hope you liked this short post on adding async validation to your Angular reactive forms.
Here is the complete code for the example.
Thanks for reading! Bye :)


