
Simple State Management in Angular with NGRX Component Store
In this article, I'm going to show you a simple way to introduce state management into your Angular apps with the NGRX Component Store package.
Video tutorial
The NGRX team has recently introduced this small library to help in managing component state. With a little bit of effort we can use it to maintain our global application state as well and make our code much more readable and maintainable.
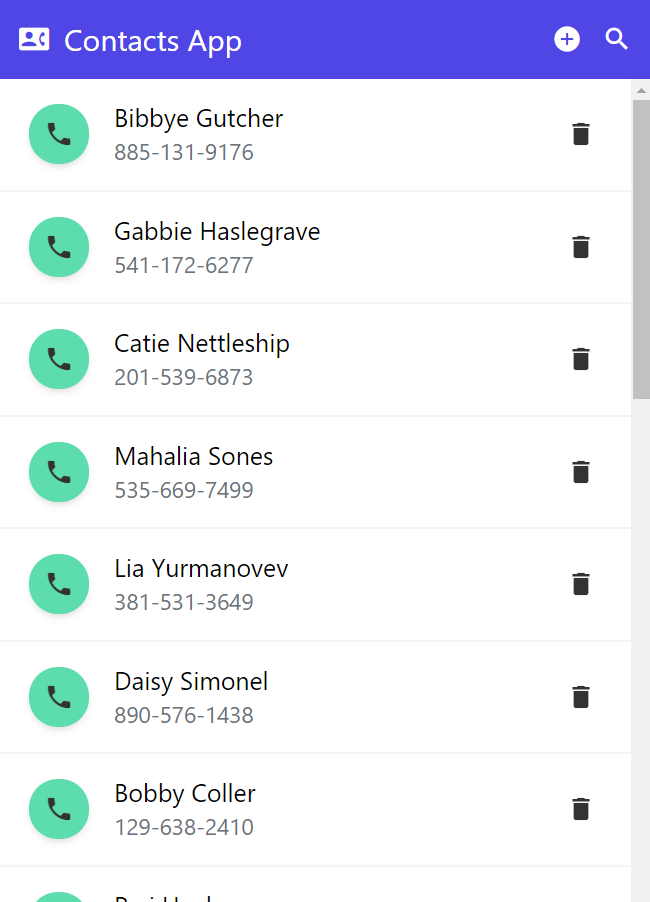
Our sample contacts app
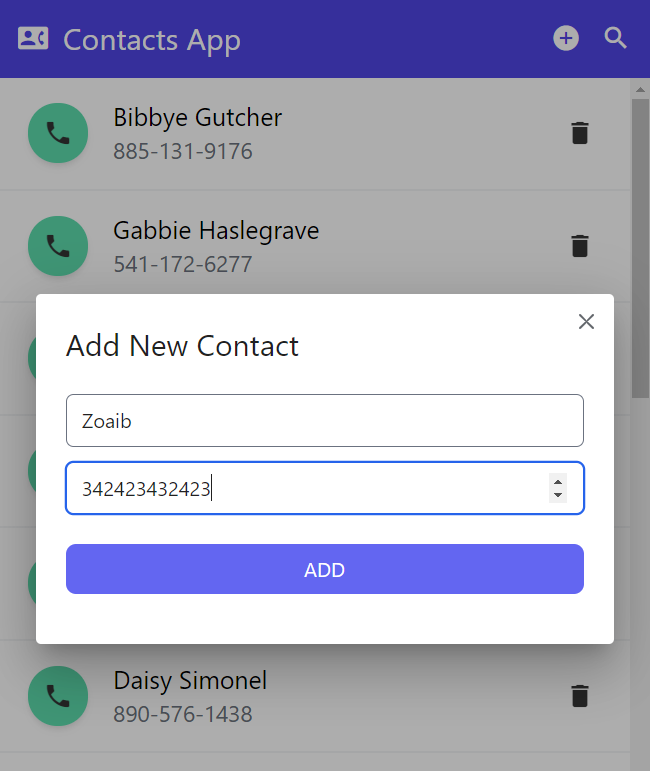
So let us see how we can add the component store to our apps. I have here a simple contacts app - where you can store your list of contacts, search for them, add a new contact and delete a contact. Oh and you can also call the contact directly using the call button. This is built without any state management.
Let's go through the code a bit!
So I have here a header component and a contacts component.
<app-header
  (searchContacts)="searchContacts($event)"
  (addContact)="addContact()"
></app-header>
<app-contacts
  [data]="filteredContacts"
  (deleteContact)="deleteContact($event)"
></app-contacts>
Header component
The header has our title, add button and search button.
For the search and add functions, we need to emit an event because our data is contained in the main component.
@Output() searchContacts = new EventEmitter<string>();
@Output() addContact = new EventEmitter<any>();
Then, we simply have some handlers which do the necessary changes on the list of data.
searchContacts(term: string) {
    this.filteredContacts = this.contacts.filter((c) =>
      c.name.toLowerCase().includes(term.toLowerCase())
    );
  }

  addContact() {
    this.dialog
      .open(AddContactComponent)
      .afterClosed$.pipe(filter((contact) => !!contact))
      .subscribe((newContact) => {
        this.contacts = [newContact, ...this.contacts];
        this.filteredContacts = [...this.contacts];
      });
  }
Contacts component
In the contacts component, we take in as input a list of contacts from the main component. And we send back an event when we delete a contact so that the main component can handle it.
export class ContactsComponent implements OnInit {
  @Input() data: any[];

  @Output() deleteContact = new EventEmitter<{ name: string; phone: string }>();
}
Now this is a simple app, but if you've multiple nested components, then you tend to get a lot of events and event handlers and it can quickly get messy. With a global store, however, you can avoid this issue entirely! We'll see in just a bit.
Adding a global store with ngrx component store
Now that we know a bit about our app, we can introduce the component store. First, let's install it with
ng add @ngrx/component-store@latest
Let's then create an interface for our contact data - so we can use it throughout our app. We'll create a new folder called models and add a new file called contact.model.ts. We'll just have two properties - name and phone.
export interface Contact {
  name: string;
  phone: string;
}
Next, we'll create our global store itself. Let's add a new folder called store and add contacts.store.ts.
The first thing we'll add here is declare a ContactsState - which would have our contacts. This state is basically the format for the data in our global store. We can keep any number of data here - we just need the contacts for now.
export interface ContactsState {
  contacts: Contact[];
}
Below this, we'll add an Injectable decorator and create a new class for our store calling it ContactsStore. This extends from ComponentStore with the type of our ContactsState.
In component store, you can initialize your state with the constructor. So we'll define a constructor and use the super method to specify our initial values. In our case, we'll shift the contacts that we have in our main component here.
@Injectable()
export class ContactsStore extends ComponentStore<ContactsState> {
  constructor() {
    super({
      contacts: [
        {
          name: 'Bibbye Gutcher',
          phone: '885-131-9176',
        },
        {
          name: 'Gabbie Haslegrave',
          phone: '541-172-6277',
        },
...

      ]
    });
  }
Ngrx Component Store Selectors
Great so we have our data in our store now. But how do you get that data to your component?
We can define a selector. If you're familiar with Redux, you'll realize it's the same concept. In short, selectors are functions we can define to get any slice of our state. We can manipulate and format that slice in any way we deem fit. So let's define a contacts$ selector in our store.
We'll use the select function in the store - where we have the state passed in and we can return whatever part of it we want. In our case, we just want the contacts data like this. We keep selectors readonly - because they're only meant for reading data :)
readonly contacts$: Observable<Contact[]> = this.select(state => state.contacts);
Great! So let's then switch over to the store in our app component.
Integrating the store with our app
Component Store is meant to be used with a component and it's state, but since we want to use it as a global store, we'll just bind it to the app component, since that'll mean it'll be available to all components inside of it. By extension, this means we'll have the state accessible everywhere in our app.
So let's go ahead and specify our ContactsStore in the providers array for this app component.
@Component({
  selector: 'app-root',
  templateUrl: './app.component.html',
  styleUrls: ['./app.component.scss'],
  providers: [ContactsStore],
})
At this point we can access the store anywhere in our app!
So let's first remove our existing data variables. Then, include the contactsStore in our constructor. Then create a new variable called contacts$ - this will be an observable and specify our selector in our store here.
contacts$ = this.contactsStore.contacts$;

constructor(private contactsStore: ContactsStore) {}
Lastly, let's just update our inputs to the contacts list. Since this is an observable, we'll use the async operator - which will subscribe and unsubscribe to it automatically!
<app-contacts [data]="contacts$ | async"></app-contacts>
Great, let's test this out now.
So as we can see the data appears fine and we're using the store now to get our contacts :)
Moving search feature to the store
Ok, so what's left now is our app functions. Let's see how we can use the store for each of them.
First, the search function! So currently, we send an event back to the app component with the search term entered. Since we don't have the data there now, we can instead send the search string to the store. For that, let's add the search string to the ContactsState and give it an initial value in the constructor.
export interface ContactsState {
  contacts: Contact[];
  searchString: string;
}

//--------------

constructor() {
    super({
      contacts: [...],
      searchString: '',
    });
  }
Then, we can create a new selector called filteredContacts$ - this returns the contacts but filtered with the search string. Note how we don't need to add any new state at all in this case, we can simply select a part of our existing state with a new selector!
readonly filteredContacts$: Observable<Contact[]> = this.select(
    ({ contacts, searchString }) =>
      contacts.filter((c) =>
        c.name.toLowerCase().includes(searchString.toLowerCase())
      )
 );
Now all we have to do when the user enters the text, is to update the search string in the state - and the data should be automagically updated!
Nice, isn't it?
So let's go in our header component and include the store there as well. Then we'll add a handler for the text change event and call the patchState method of the store to update the search String with the value.
<input class="..." (keydown)="searchContacts($event.target.value)" />
searchContacts(searchString: string) {
    this.contactsStore.patchState({ searchString });
}
Component store provides multiple ways to update the state in your store.
- setState - this will replace the whole state with the new value
- patchState - this will update just the part of the state specified
Since we just need to update the searchString, we'll use patchState.
Now all we have to do is to change our contacts to refer to the filteredContacts$ instead and it should all work!
contacts$ = this.contactsStore.filteredContacts$;
Great! When you test it out now, the search will work and we don't need to maintain multiple copies of the data as before, because our logic is stored in a selector instead. Also, we don't need any events as well since our contacts store is global and can be accessed anywhere in the app.
Moving add contact to the store with updaters
Next, let's see how to use the store for the add contact functionality. So for add contacts, we'll be adding a contact to the contacts data in our state. Instead of the event, let's just add a handler as with the search. We can then use patchState as before, but let me introduce something different!
Component store also provides another way to update state i.e. to create an updater.
If you're from a Redux background, this is similar to a reducer. Basically it's a function which updates the state and exactly how that is done is a part of the store itself - which means the business logic will be encapsulated there instead of our component.
So let's create an updater in the store called addContact. The updater function takes in the current state and the arguments - which in our case will be the new contact data. It should then return the new state immutably i.e. in a different object.
  readonly addContact = this.updater((state, contact: Contact) => ({
    ...state,
    contacts: [contact, ...state.contacts],
  }));
Here we'll just use the spread operator to return a new array with the previous contacts and the new contact. Then, we can call this updater function in our header component.
addContact() {
    this.dialog
      .open(AddContactComponent)
      .afterClosed$.pipe(...)
      .subscribe((newContact) => {
        this.contactsStore.addContact(newContact);
      });
  }
OK, let's test this!
Great, so we can now add a new contact through the store leveraging the updater function! One more piece of core logic shifted away from the component :)
We can continue like this for the delete function as well. I'm going to skip the steps here because you get the overall idea. Let's just see how the delete updater looks like in the end.
readonly deleteContact = this.updater((state, contact: Contact) => {
    const contactsCopy = [...state.contacts];
    const index = contactsCopy.findIndex((c) => c.name === contact.name);
    contactsCopy.splice(index, 1);

    return {
      ...state,
      contacts: contactsCopy,
    };
 });
Just a little bit of logic here to create a new contacts list, delete the one we want to and then updating the state with the new contacts.
Benefits of a global store to manage state
Now that we've made our app functional with the ngrx component store, let's go over the benefits it brings.
You'll notice two things:
- There are no event emitters required now, since we can call the global store for any functionality. As I said before as well, this makes the app cleaner especially as it gets larger. Of course, for components you want to reuse (aka presentational components), it still makes a lot of sense to use event emitters, since then you cannot bind the component to a store and would like to keep it reusable in multiple places in your app.
- The components are now basically devoid of any business logic - in fact components are used to do what they do best - i.e. display the UI.
The business logic is now contained in our store and whenever we need to change it in the future, we know where to look for! This makes testing a lot easier as well.
Conclusion
So there you have it. A simple, state management solution for simple to moderate sized Angular apps using the Ngrx component store. We covered the concept of the ngrx component store, selectors, updaters and using the setState and patchState methods.
In my next post, I'll be going over the concept of Effects in ngrx component store, because it is a little bit more complex and requires separate treatment.
The complete code for this tutorial can be accessed here.
Thanks for reading!
Bye :)


