Create Dynamic Form Controls in Angular with FormArray
In this tutorial, we'll learn how to create dynamic form controls in Angular using Angular FormArray API.
Video tutorial
While building forms for our apps, most of the time we know in advance what fields the user needs, so we statically lay them out in our templates. But sometimes, we come across a particular data point which can have variable numbers of inputs.
When do we need dynamic controls?
So for example, we can have form inputs such as interests or hobbies. Some users might have 2 hobbies, others might have 5 and so on. We need a way for the user to dynamically add and remove form controls, so that they can enter the required number of inputs.
Angular Reactive Forms API provides a very nice FormArray class that allows us to do this quite easily.
Coming back to our tutorial, we'll be building a form control which allows the user to add as many hobbies as he/she wants. Something like the following. As we change the number of value, the form array value gets updated as well!
So let's get started.
Setting up the project
Let's setup the project by creating a new one and adding the angular material components.
ng new angular-form-array
ng add @angular/material
Then, we'll add the necessary material modules in our imports.
import { MatToolbarModule } from '@angular/material/toolbar';
import { MatFormFieldModule } from '@angular/material/form-field';
import { MatIconModule } from '@angular/material/icon';
import { MatButtonModule } from '@angular/material/button';
import { MatInputModule } from '@angular/material/input';
import { ReactiveFormsModule } from '@angular/forms';

@NgModule({
  declarations: [AppComponent],
  imports: [
    BrowserModule,
    BrowserAnimationsModule,
    MatToolbarModule,
    MatFormFieldModule,
    MatInputModule,
    MatButtonModule,
    MatIconModule,
    ReactiveFormsModule,
  ],
  providers: [],
  bootstrap: [AppComponent],
})
Great!
Creating our FormArray
Let's then create our form array in our app component ts file. We'll call it hobbiesArray and this will be a new FormArray. Now for a form control, we give it an initial value. Here since we have a FormArray, we've to give it an initial array of form controls.
In our case, we want the user to at least have one hobby, so we'll specify here an array with a single value. This value will be a new FormControl with an empty value and the required Validator - because we don't want it to be empty.
hobbiesArray = new FormArray([new FormControl("", Validators.required)]);
Ok, with that setup. Let's move on to creating some layout for this in our template file.
Creating the form layout
We'll go in app.component.html and add a container div and a title for the control.
Now let's add a div with an *ngFor directive. We're going to loop through the form array controls using the directive as below.
<div class="container">
    <h2>Please add as many hobbies are you want below</h2>
    <div *ngFor="let hobby of hobbiesArray.controls>
        <mat-form-field>
            <input matInput [formControl]="hobby">
        </mat-form-field>

   </div>
</div>
Inside of this, we've simply created a new mat-form-field and an input with matInput directive. Lastly, we need to add the formControl directive with our hobby as declared above.
So in short, we're just using the FormArray controls to generate the form fields on our form.
Let's test this out with ng serve!
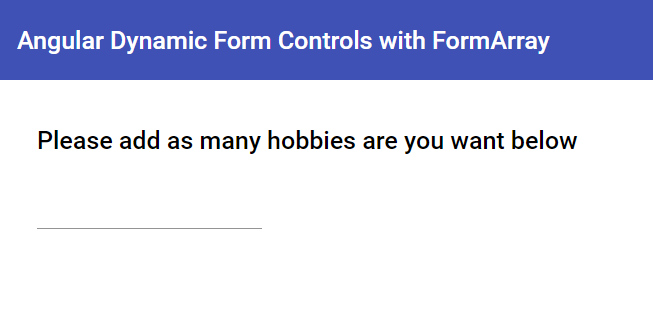
Great, so we can see just one input form control here because that was the initial value we provided.
Adding input controls dynamically
So how do we add a new input control on the UI? Since we've bound it with our Angular FormArray, we just need to add a new form control to the FormArray and it should show up.
Let's add a mat-icon-button besides the input form field to add a new control. To do that we'll have to add some style and convert the div into a flex row. We'll add a class to the div and add the styles in our css file.
.input-row {
  display: flex;
  align-items: center;
}
Next, let's add the button itself. We'll give it a primary color and specify the icon as add_circle. But we only want to show it on our last form control, so we'll add a declaration in the *ngFor loop for that and an *ngIf on our button.
<div *ngFor="let hobby of hobbiesArray.controls; last as isLast">
  <button
    mat-icon-button
    color="primary"
    *ngIf="isLast"
    (click)="addInputControl()"
  >
    <mat-icon>add_circle</mat-icon>
  </button>
</div>
Lastly, to make all of this work, we added the event handler on click. We'll add a function called addInputControl. Here we'll access our hobbiesArray and just push a new FormControl with the same initial values.
addInputControl() {
    this.hobbiesArray.push(new FormControl('', Validators.required));
}
Let's test this now.
Great, so we can add a control with our button!
But of course, we also need to allow the user to remove a control.
Remove Input Controls Dynamically
Let's add another icon button now. The icon in this case will be remove_circle and the color we'll specify as "warn".
Let's add a click event handler called removeInputControl. Now since here we'll need to tell the function which control to remove, we need to add an index to our *ngFor loop. And then we'll pass in the same to our event handler.
<div
  *ngFor="let hobby of hobbiesArray.controls; last as isLast; index as idx"
  class="input-row"
>
  ...
  <button mat-icon-button color="warn" (click)="removeInputControl(idx)">
    <mat-icon>remove_circle</mat-icon>
  </button>
  ...
</div>
Great! Let's move to our code to add this functionality. We'll add a new function called removeInputControl with an input of index. We have a very easy to use function in our hobbiesArray called removeAt which takes in the index.
removeInputControl(idx: number) {
    this.hobbiesArray.removeAt(idx);
}
And we're done! Let's test this out.
Great we can remove the added controls now. But wait, we can also remove ALL controls. And then we don't have any way to add the control back again ☹
So, let's add a small *ngIf on our delete button, to only show it when there are more than one controls in the FormArray.
<button mat-icon-button color="warn" ... *ngIf="hobbiesArray.length > 1">
  <mat-icon>remove_circle</mat-icon>
</button>
Great! Let's test this again.
Cool, so now the user can remove an input if needed, but not if there is just one input control left.
Verifying the FormArray value
Lastly, let's also verify if we're getting the right value out of the Angular FormArray. We'll quickly add another heading and then another div to show the value of the hobbiesArray using valueChanges and the async pipe. Also, the json pipe which shows us the value as a JSON object.
<h2>Form Value</h2>
<div>{{hobbiesArray.valueChanges | async | json}}</div>
Testing this out, we can now see our FormArray value getting updated whenever we make any change to it 🎉
Conclusion
And that's it for this tutorial. So as you can see Angular FormArrays are pretty useful when you want to create form controls on the fly in Angular.
You can use this to build dynamic quizzes with different multiple choice questions or pretty much any form which requires variable number of inputs.
The complete code for this tutorial can be found here.
Thanks for reading! Bye :)


